

As enthusiastic as you may be about gaming, you are probably not that happy about having to maintain tech-equipment on a weekly basis. On the other hand, if you want to keep up with good performance, then you should consider it as an integral part of your success. The first step in learning how to clean a gaming keyboard is to make sure that you have a mechanical one.
There are many advantages to owning a mechanical keyboard as opposed to a rubber dome keyboard. That being said, spending a few more dollars is an investment that you will not regret. Not only is it much easier to clean, but it also allows for a longer lifespan. This is incredibly important given the heavy keyboard use that is common for professional gamers.
The main reason maintaining a mechanical one is easier than a rubber dome keyboard is because of the design of the keyboard itself. Highlighted by physical switches and high-quality keycaps that are easy to take off, the whole process is user-friendly. Additionally, if you decide to go for spill-proof keyboards, the amount of cleaning that you need to is automatically reduced.
Bearing this in mind, we have prepared a set of different cleaning methods for you, as well as tips on how to effectively do it. Let’s get right to it!
Preventive Cleaning
As with anything in life, it is better to prevent an issue than have to cope with it. So the first step in maintaining a smooth and tactile mechanical keyboard is to take time on a daily basis to ensure its performance. This way, it will not require as much effort when you are required to perform a heavy-duty cleaning session. You will avoid having to deal with a bunch of sticky keys.
The main reason why you want to do this is to ensure dust and food will not get in between the keys. This can hinder the mechanical switches from working efficiently. The main idea is to keep the metal plates well maintained. The first step of preventive cleaning is to unplug your keyboard. This will ensure that any of the pre-configured settings are not messed up during the process. Also, dusting keycaps and the space between the keys could mess up RGB illumination if the keyboard was on.
What kind of tool should you use to ensure the best results? Our personal recommendation would be a small hand vacuum or vacuum with a thin nozzle attachment (without rotating brushes). The whole idea is to dust and vacuum any particles and residue that are left from food and everyday use. In order to do this, you will need to actuate each key, which is not that easy if you are using a bigger vacuum tube.
Additionally, using a small handheld one will allow you to maneuver into hard to reach places. This will help make sure that everything gets cleaned off properly. You should be careful to apply only as much pressure as needed with the vacuum. Make sure that you do not let the weight of the vacuum tube fall onto the metal plate.
Once you are done with that, lightly dampen a microfiber cloth and use it to wipe the surface. Follow that up by drying the whole keyboard with a second microfiber cloth. Using paper products to wipe it off is not the best idea. It might shed particles that can get stuck and cause an issue with the mechanical switches.
PRO TIP - Avoid using compressed air on mechanical keyboard switches. This is because the air is often cold and can cause condensation which can eventually end up with forming corrosion and grime to build up.
Preventative cleaning steps:
- Unplug your keyboard
- Turn the keyboard upside down - Turn you keyboard over and gently let any particles fall out on their own. I wouldn't recommend shaking your keyboard too vigorouly while doing this.
- Use a vacuum to get rid of dust and particles - With the vacuum turned on, carefully put the vacuum attacments nozzle on a keycap and gentle actuate it (gentle push the keycap up and down). Ideally you'd want to repeat this for all the key caps. A smaller hand held vacuum usually work best for this.
- Wipe entire keyboard down - A slightly damp microfibre cloth is recommended for this. Wipe the bottom and top of the keyboard including the casing. And then wipe each individual key carefully. You don't want the cloth to be fluffy, so lint free is best. Also make sure the cloth isn't wet, it should only be ever so slightly damp so make sure you wring it out properly before you wipe
Heavy-Duty Cleaning
Preventive cleaning is sure to keep many common maintenance issues at bay. However, this does not eliminate your duty to take the keycaps apart and perform more intricate cleaning every now and then. There is nothing complicated about this process, either. As long as you have 30 minutes to spare, it will be a smooth process. The key here is to have the mechanical switches well cleaned. This will ensure that the quiet and tactile operation of your mechanical keyboard is not affected.

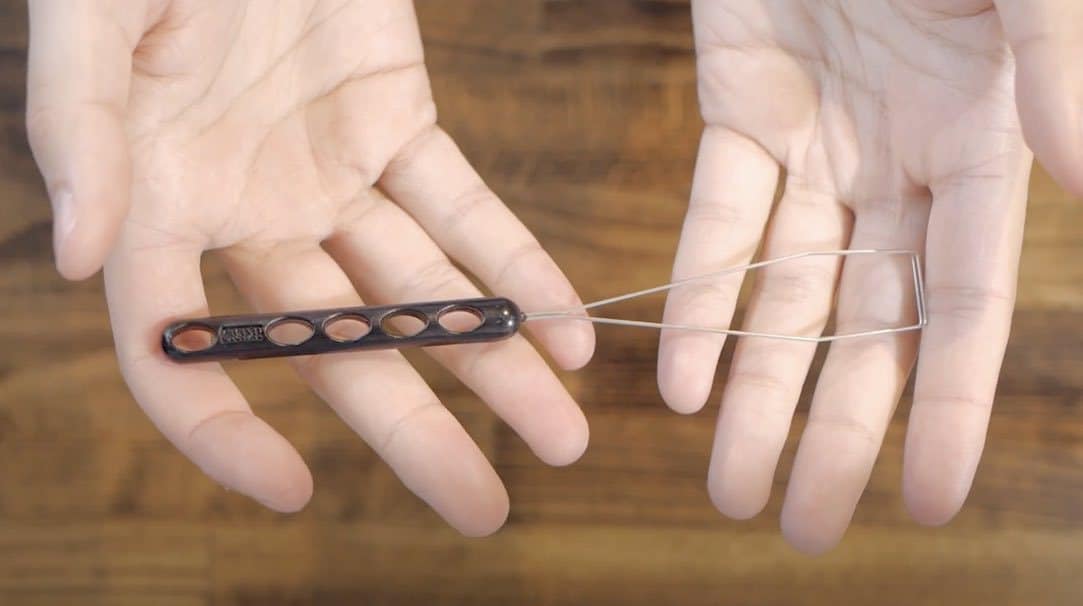
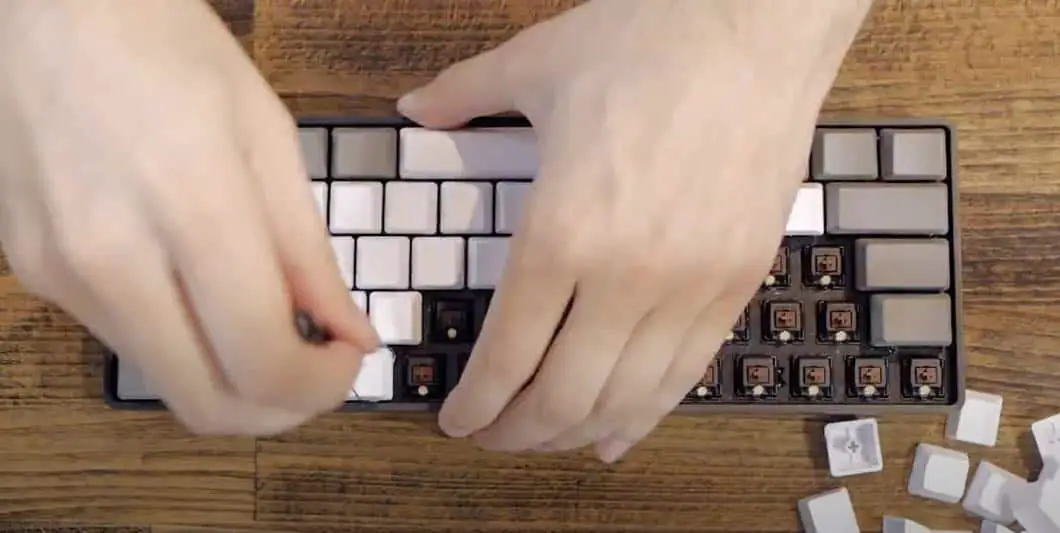
In order to complete this process, you will need to be comfortable with removing the keycaps and placing them back. Remember, there is nothing to worry about. As long as you have a proper keycap puller and enough time, there is nothing that can go wrong. Once you have unplugged the keyboard, make sure to take out all the keycaps. Put more focus on the big keys that are usually more stubborn.


One of the best agents that will help you get rid of all residue at the keycaps is a denture tablet. Pick out a larger container, fill it with lukewarm water, and dissolve these tablets in it. Cover it and let the keycaps sit in this mixture for 6 to 8 hours. Once you have done that, don’t reseat the keycaps until all of them have been thoroughly air-dried.
While that is happening, start cleaning the metal plate by using a small bristle brush to remove any dust or debris that has accumulated. Once you have done that, proceed by vacuuming with a handheld tool and ensuring that everything is cleaned thoroughly. Turn the keyboard face-down to prevent further dust-buildup while you are waiting for the keycaps to dry out.
Once dry, reseat the keycaps and wipe everything down with a damp microfiber cloth. Finally, the last step is to use a completely dry cloth to remove the last of any dust particles and residue.
Conclusion
You probably will not enjoy the preventive or advanced cleaning process as much as you do gaming. However, it is not something that you should be stressed out by. We have done our best to provide you with a couple of methods and tips to make the whole process more efficient. It all comes down to having enough time and making sure that you clean the keyboard on a regular basis.
By being devoted to maintaining your equipment, you will ensure a longer lifespan for your keyboard. This will help your mechanical keyboard last much longer than an ordinary rubber dome keyboard.